Baked Chicken Pockets with Cheesy Goodness
Savor the best Baked Chicken Pockets with Cheesy Goodness! Easy to make and perfect for busy nights, these cheesy hand pies are a hit for the whole family!

- A Warm Introduction to Comfort
- A Taste Through Time
- Why You’ll Love Them
- Getting Started on the Ingredients
- Essential Ingredients Guide for Baked Chicken Pockets with Cheesy Goodness
- Mastering the Art of Baked Chicken Pockets with Cheesy Goodness
- Additional Recipe Information for Baked Chicken Pockets with Cheesy Goodness
- Frequently Asked Questions
- Recipe Card
A Warm Introduction to Comfort
Have you ever had one of those days when you just need comfort food ? you know, something that wraps you in a cozy blanket of creamy goodness? for me, it all started one rainy evening.
I was at home, staring at the fridge, feeling a bit lost. then, out of nowhere, i discovered remnants of leftover chicken just chilling there.
A light bulb went off! why not whip up some baked chicken pockets with cheesy goodness ? trust me; this journey is one you’ll want to take!
These little pockets of joy are much more than just food; they’re memories waiting to happen. picture this: golden, flaky pockets cradling tender chicken, gooey cheese, and spices – it’s a celebration of flavors that even kids can’t resist.
And hey, if you’ve got a family full of picky eaters, these chicken hand pies will be a hit!
A Taste Through Time
Baked chicken pockets with cheesy goodness are inspired by traditional hand pies that trace their origins back centuries. cultures worldwide have their own spin on these delightful pastries, making them a staple in many households.
Fast forward to today, and they remain a go-to for family-friendly dinners and potlucks alike! (can we say crowd-pleaser?)
This recipe balances modern convenience and a touch of nostalgia, making them perfect for quick weeknight meals or special occasions.
The prep time is pretty straightforward too – about 15 minutes of hands-on time (plus a little chilling) and around 30 minutes in the oven.
Before you know it, you have a plate of cheesy chicken pockets ready to devour!
Why You’ll Love Them
Let’s talk about the key benefits of these delicious treats. first off, they’re packed with protein, making them a great choice for a satisfying meal.
Each pocket contains a lovely blend of flavors: think creamy chicken goodness, zesty spices, and, of course, oodles of melted cheese.
Seriously, did someone say cheddar cheese pockets ?
These pockets are versatile too! you can serve them as an appetizer or part of a hearty dinner. they’re perfect for parties or movie nights, and if you’ve got any leftovers? they reheat like a dream, making for great lunch ideas the next day.
Honestly, who wouldn’t want a bite of that?
Another nifty bonus: you can freeze these little delights for future cravings. Ever had a day where you just can’t think about cooking? Pop one of these in the oven, and BAM, dinner is served! Talk about the ultimate oven-baked snack !
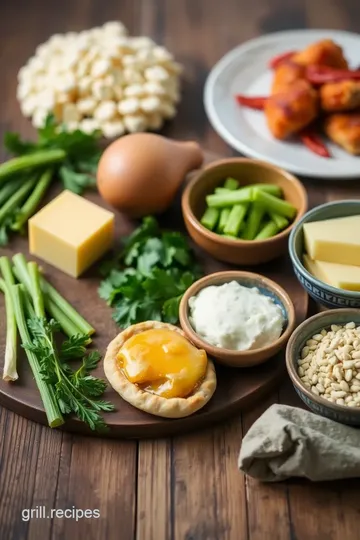
Getting Started on the Ingredients
So, ready to dive into making your own Baked Chicken Pockets with Cheesy Goodness ? Grab your rolling pin, clear a workspace, and let’s explore what’s needed!
For the dough, you’ll need some all-purpose flour , butter , a touch of salt , and a splash of cold water .
Easy peasy, right? and for the heavenly filling? we're talking about shredded cooked chicken , a mix of cheeses including cream cheese , and spices that will give your pockets just the right kick.
Feel free to get creative here – cream cheese opens the door to all sorts of cheesy filling ideas .
Next, be sure to have the tools ready: a mixing bowl, a rolling pin, and some parchment paper. We're in this together, and I promise, the process is just as fun as the eating part!
So ditch the takeout menu tonight and whip up your own homemade version of a classic comfort dish. trust me, after the first bite, you’ll understand why these savory hand pies are a must-try.
Let’s get cooking!
Essential Ingredients Guide for Baked Chicken Pockets with Cheesy Goodness
Oh my gosh, have you ever tried making baked chicken pockets with cheesy goodness ? if not, you’re in for a treat! these little pockets of joy are all about comfort food.
Filled with tender chicken, ooey-gooey cheese, and nestled in flaky pastry dough, they make a fantastic quick weeknight meal or a hit at potlucks.
But to nail this recipe, knowing your ingredients is key. let’s dive into the essential ingredients guide so you can create these delicious pockets with confidence!
Premium Core Components
Let’s talk about those must-have premium core components . first up, measurements ! you'll need 2 cups of all-purpose flour (240g) for the dough, and since we’re in america, that’s what we’ll stick to.
When it comes to quality, quality indicators for flour? look for a fine texture and a lack of lumps. fresh flour is usually more flavorful.
Storage? keep that flour in a cool, dry place, and it should last about six months. but here’s a tip: if you’re not using it often, stick it in the fridge for extra shelf life (just remember to bring it back to room temperature before use).
Freshness Tips
Checking for freshness doesn’t have to be rocket science. sniff it! if it smells off, toss it. and when selecting your chicken, always go for the freshest cuts you can find.
When you grab that cooked chicken for the filling, rotisserie chicken is a star for convenience and flavor. you can whip up more easy chicken recipes with leftover chicken meals!
Signature Seasoning Blend
Now, let’s get to the fun part - the flavor! a perfect signature seasoning blend for your chicken is a game changer.
Salt, pepper, and paprika are your foundation, but don’t stop there! add in a sprinkle of garlic powder and onion powder to amplify the flavors.
Trust me, your family will taste the love in these savory hand pies .
And listen, some people might throw in a pinch of cayenne for a heat kick. That’s a regional variation you might love—spice up those pockets and let your taste buds dance!
Smart Substitutions
Life happens, and sometimes you need smart substitutions . maybe you're out of cream cheese? no biggie! you can use greek yogurt for a lighter filling.
And if cheddar's not your jam, mozzarella works just as well.
What about a vegetarian option ? swap the chicken for sautéed veggies like spinach and mushrooms. and if you want a last-minute hero, keep some frozen chicken pockets ready to bake.
They are lifesavers for those busy evenings!
Kitchen Equipment Essentials
When you’re cooking up these delightful cheesy chicken pockets , having the right tools makes all the difference. you don't need a fancy kitchen—just some basic gear.
Here’s a quick rundown of must-have tools :
- Mixing bowls
- A rolling pin (or a wine bottle in a pinch!)
- Baking sheets and parchment paper
- A pastry cutter or fork to mix that dough
- A ladle or spoon, because you’ll want to fill those pockets properly!
Oh, and don't forget about storage solutions! Use airtight containers to keep your baked pockets fresh and tasty. They'll save well in the fridge for about 3 to 4 days.
Wrap It Up!
Now that you’ve got a good grasp on the essentials, you're ready to whip up those baked chicken pockets with cheesy goodness .
Just think about how much fun it’ll be to share these tasty bites with your family or friends. look into into your kitchen, play around with those filling combinations and spice it up!
Next, let’s jump straight into instructions —because I can’t wait for you to taste these amazing baked chicken recipes!

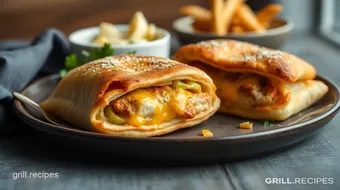
Mastering the Art of Baked Chicken Pockets with Cheesy Goodness
Who doesn’t love a warm, cheesy treat? baked chicken pockets with cheesy goodness are not just any snacks; they’re like little golden nuggets of comfort food happiness! picture this: flaky pastry, savory chicken, and ooey-gooey cheese all wrapped up in a handheld delight.
Sounds good, right? let’s deep dive into the professional cooking methods behind this easy chicken recipe to elevate your kitchen game!
Essential Preparation Steps
Alright, first things first— mise en place ! it’s a fancy french term that just means having everything you need ready to go before you start cooking.
You don’t want to be scrambling around when it’s time to bake those cheesy chicken pockets ! lay out your ingredients, measure them out, and get your tools handy.
Trust me, this makes everything a breeze.
Time management is key. you want to keep yourself on track. i often set timers for various tasks. for example, when the dough is chilling for 15 minutes , i set a timer to keep me in check.
This doesn't mean you’re rushing but rather using your time wisely.
Organization goes hand in hand. clean as you go. it’s easy for chaos to take over the kitchen, and nobody wants that.
Plus, keeping your workspace tidy creates an entertaining atmosphere for whoever’s hanging around.
And, of course, safety comes first! Always handle sharp knives carefully and make sure to keep raw chicken separate from other ingredients to avoid cross-contamination.
Step-by-Step Process
Now that you’ve got a neat and tidy setup, let’s get into the nitty-gritty of making our Baked Chicken Pockets!
-
Prepare the dough: combine 2 cups of flour with 1/2 teaspoon of salt . cut in 1/2 cup of cold, cubed butter until it looks like coarse crumbs.
Then, slowly add 1/4 cup of cold water . this dough needs a quick chill in the fridge for 15 minutes .
-
Make the filling: in your mixing bowl, stir together 2 cups of shredded chicken , 1 cup of shredded cheese , 1/2 cup cream cheese , and a pinch of garlic powder, onion powder, and paprika.
Season with salt and pepper. you want that cheesy filling to sing, you know what i mean?
-
Roll Out the Dough: Preheat your oven to 375° F (that’s 190° C for my metric friends). Roll the chilled dough out to about 1/8-inch thick and cut 5-6 inch rounds.
-
Fill those pockets: now comes the fun part! spoon a couple of tablespoons of your filling onto each dough round, fold it over, seal those edges, and crimp them with a fork.
You can’t go wrong with a good seal!
-
Bake: arrange those beauties on a lined baking sheet, brush with a little beaten egg for that golden finish, and slide them into the oven.
Bake for 25- 30 minutes or until they’re perfectly golden brown.
Expert Techniques
Here’s where we get a bit fancy. temperature control is super important. baking is a science! if your oven runs hot, you may want to check your chicken pockets sooner, as they could over-bake.
And timing? well, it can make or break your meal. keep a close watch during that 25-30 minute window.
Quality checkpoints are also key. when those pastries puff up and turn golden, you’ll know you’re in the zone. if they look a little soft when you take them out, give them a minute to cool.
They’ll firm up nicely.
Now let’s talk troubleshooting. If your pockets don’t seem crispy, perhaps your oven wasn’t hot enough or you didn’t allow the dough to chill properly. Remember—these factors matter!
Success Strategies
Avoiding common mistakes is half the battle. One huge pitfall is overfilling those cheesy chicken pockets . You want just the right amount to ensure they seal well.
Also, trust the process. If your dough gets tough, it probably means it’s been overworked. Make sure to fold gently, and don’t skip that chill time!
If you’re short on time, consider making these pockets ahead and freezing them. they're such a great make-ahead option for potlucks or busy nights.
Just pop them in the oven straight from frozen and adjust your baking time a few minutes more.
Wrapping It Up
So there you have it, folks! baked chicken pockets with cheesy goodness aren’t just a snack; they're an experience. through these expert methods and friendly tips, you’ll master this dish and make it a staple in your kitchen.
Trust me, once you get the hang of it, you'll want to experiment with all kinds of fillings. How about throwing in some veggies or spicy chicken pockets for a kick?
For more insights, tips, and variations on these delicious hand pies, let's dive into some additional information that can keep those creative juices flowing and feed your culinary adventures. Happy cooking!
Additional Recipe Information for Baked Chicken Pockets with Cheesy Goodness
Oh my gosh, let’s talk about how to take your baked chicken pockets with cheesy goodness to a whole new level! this dish isn’t just about tasty bites of chicken and cheese wrapped in flaky pastry; it’s about creating a little magic in the kitchen.
So grab your apron and let’s dive in!
Pro Tips & Secrets
Let me share some of my favorite pro tips with you. first off, when it comes to dough recipe for pockets , make sure your butter is super cold .
It helps get that flaky texture we all love. and if you're in a rush, you can cheat a bit and use store-bought dough.
No shame in that game!
Looking to save time? here’s a quick tip: prepare your dough the night before and pop it in the fridge.
It'll save you about 15 minutes of prep time for your busy weeknight meals. also, if you’re feeling adventurous, mix up that cheesy chicken filling! add some herbs for a fresh twist or even a spoonful of your favorite mustard for a zing.
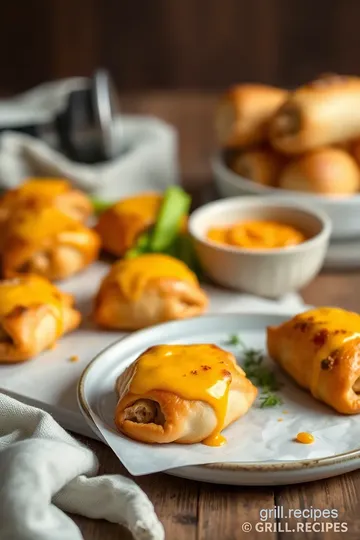
Perfect Presentation
Now, let’s chat about presentation because you know we eat with our eyes first, right? when it comes to plating techniques , simply laying those golden pockets on a platter won’t do.
Arrange them in a circular formation and sprinkle some fresh parsley for that green pop. super simple, but it really elevates the dish!
As for garnish ideas , think of a fun dipping sauce. whether it's a classic ranch dressing or a spicy sriracha mayo, it’ll entice everyone.
Use contrasting colors like bright red sauces against the golden pockets for visual appeal. who doesn’t want to see their food looking good ?
Storage & Make-Ahead
Got leftovers? don’t let those precious chicken snacks go to waste! store any uneaten pockets in an airtight container in the fridge.
They'll stay good for about 3 days. to reheat, pop them back in the oven at 350° f ( 175° c) for about 10- 15 minutes until warmed through.
They'll regain that crispy texture, and trust me, no one likes a soggy pocket!
If you want to make-ahead, consider making a batch as a chicken pocket freezer meal . just assemble and freeze them before baking.
When the craving hits, bake frozen pockets straight from the freezer – no thawing necessary, just add a couple of extra minutes to the baking time.
Creative Variations
Let’s get a little wild with recipe variations for pockets ! you could give it a mediterranean flair by changing up the filling to include feta, olives, and spinach for those sun-soaked summer vibes.
Or go spicy with diced jalapeños or pepper jack cheese for a zesty kick!
For vegetarians, swap out that chicken for some sautéed mushrooms and spinach. You won’t even miss the meat! The goal is to create savory hand pies everyone can enjoy.
Complete Nutrition Guide
Alright, let’s talk numbers! these pockets serve as a hearty meal but can also work well as an easy appetizer .
Each serving provides about 450 calories, packed with protein thanks to that shredded chicken. plus, you can easily tweak the filling to include healthier options like greek yogurt instead of cream cheese.
When dishing out portions, two pockets per person works great – especially if you’re enjoying them with a side salad.
Honestly, these make for perfect get-together food, like at potlucks or family gatherings.
So whether you're warming up a few for dinner or impressing your friends at a game night, baked chicken pockets with cheesy goodness is sure to be a hit.
Remember to have fun with the recipe. cooking should be a joy, so play around, and don’t take it too seriously.
Happy cooking, amigos!
Frequently Asked Questions
What are Baked Chicken Pockets with Cheesy Goodness and how can I make them?
Baked Chicken Pockets with Cheesy Goodness are flaky pastry pockets filled with a delicious mixture of shredded chicken and melted cheese. To make them, prepare the dough from scratch or use puff pastry, fill it with a chicken and cheese mixture, seal them, and then bake until golden brown. It's a perfect comfort food option for busy weeknights!
Can I make Baked Chicken Pockets with Cheesy Goodness ahead of time?
Yes, you can prepare the pockets in advance! Assemble them and store them in the refrigerator for up to 24 hours before baking. Alternatively, you can freeze the uncooked pockets and bake them directly from the freezer; just add a few extra minutes to the baking time.
What variations of the filling can I use for Baked Chicken Pockets with Cheesy Goodness?
You can get creative with the filling! For a spicy kick, add diced jalapeños or hot sauce. If you prefer a vegetarian option, try using sautéed vegetables like spinach, mushrooms, and bell peppers. Herb-infused variations with fresh parsley or basil can also enhance the flavor!
How should I store leftovers from Baked Chicken Pockets with Cheesy Goodness?
Leftover baked chicken pockets can be stored in an airtight container in the refrigerator for up to 3 days. To reheat, place them in a preheated oven at 350°F (175°C) for about 10-15 minutes until warmed through, which helps maintain their crispy texture.
Is it possible to make a healthier version of Baked Chicken Pockets with Cheesy Goodness?
Absolutely! You can make them healthier by using whole wheat flour for the dough and substituting cream cheese with Greek yogurt. Additionally, opting for low-fat cheese and adding more vegetables to the filling are great ways to reduce calories while still enjoying this tasty dish.
What dipping sauces pair well with Baked Chicken Pockets with Cheesy Goodness?
These chicken pockets pair wonderfully with various dipping sauces. Classic options include marinara sauce or ranch dressing. For a zesty twist, try sweet chili sauce or a tangy garlic aioli, which can complement the cheesy goodness deliciously!
Baked Chicken Pockets with Cheesy Goodness Card
⚖️ Ingredients:
- 2 cups all-purpose flour
- 1/2 teaspoon salt
- 1/2 cup unsalted butter, cold and cubed
- 1/4 cup cold water
- 2 cups cooked chicken, shredded
- 1 cup shredded cheese (cheddar or mozzarella)
- 1/2 cup cream cheese, softened
- 1 teaspoon garlic powder
- 1 teaspoon onion powder
- 1/2 teaspoon paprika
- Salt and pepper to taste
- 1 egg, beaten (for egg wash)
🥄 Instructions:
- Step 1: In a mixing bowl, combine flour and salt.
- Step 2: Add cold cubed butter; use a pastry cutter or fork to work it into the flour until it resembles coarse crumbs.
- Step 3: Gradually add cold water, mixing until the dough comes together.
- Step 4: Form the dough into a ball, wrap in plastic, and refrigerate for 15 minutes.
- Step 5: In a large bowl, mix shredded chicken, cheese, cream cheese, garlic powder, onion powder, paprika, salt, and pepper until well combined.
- Step 6: Preheat the oven to 375°F (190°C). On a floured surface, roll out the dough to about 1/8-inch thickness.
- Step 7: Cut out rounds (approximately 5-6 inches in diameter).
- Step 8: Place a spoonful of filling in the center of each round.
- Step 9: Fold the dough over to create a half-moon shape and pinch the edges to seal. Use a fork to crimp the edges for extra security.
- Step 10: Place the chicken pockets on a baking sheet lined with parchment paper.
- Step 11: Brush with beaten egg for a golden finish.
- Step 12: Bake for 25-30 minutes or until golden brown.
Previous Recipe: Easy Crispy Tortilla Apple Delight: A Sweet Wrap of Flavor
Next Recipe: My Favorite Toast Kala Chana Nutritious Sandwich Recipe: Easy & Delicious!