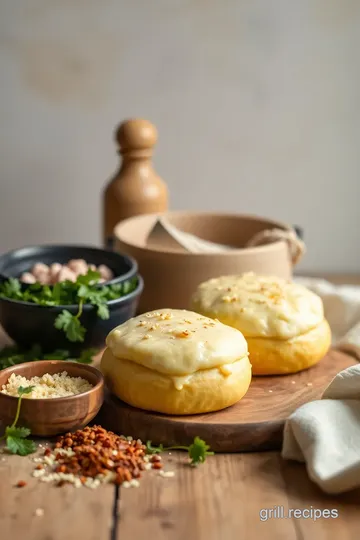
Deliciously Cheesy Bake Paneer Buns
Craving the best Bake Paneer Buns with Melty Cheese Delight? Try my simple recipe that combines soft, herb-glazed buns with rich cheesy filling!

- look into Into the Delicious: Bake Paneer Buns with Melty Cheese Delight
- A Little Backstory to These Yummies
- Why You’ll Love These Cheesy Buns
- Perfect for Every Occasion
- Unlocking the Essentials for Perfectly Baked Paneer Buns
- Professional Cooking Method for Baking Paneer Buns with Melty Cheese Delight
- Pro Tips & Secrets for Bake Paneer Buns with Melty Cheese Delight
- Perfect Presentation: Elevate Your Buns
- Storage & Make-Ahead: Keep Those Buns Fresh
- Creative Variations: Spice It Up
- Complete Nutrition Guide: Easy on the Eyes
- Your New Favorite Dish Awaits!
- Frequently Asked Questions
- Recipe Card
look into Into the Delicious: Bake Paneer Buns with Melty Cheese Delight
Have you ever stumbled upon a recipe that made your heart skip a beat? that was me the first time i laid eyes on the bake paneer buns with melty cheese delight .
Picture this: golden, soft buns that promise a cheesy surprise inside. honestly, i was like a kid in a candy store, itching to whip these up.
These buns are not just food; they're an adventure on a plate, perfect for sharing during game night, brunch with friends, or even cozying up on a lazy sunday.
A Little Backstory to These Yummies
Originating from the vibrant streets of india, these baked paneer buns have made their way into kitchens around the world.
The soft, pillowy texture isn’t just a dream; it’s a delicious reality. they’ve grown in popularity not just for their taste but also for how easy they are to make once you get the hang of the dough.
Taking about 1 hour and 50 minutes from start to finish, you’re looking at some fun kitchen time. the magic starts when you combine warm milk, sugar, and yeast, creating a cozy little bubble of happiness right in your bowl.
Why You’ll Love These Cheesy Buns
Let’s unpack some of the key benefits of making cheese stuffed buns . first off, they’re a fantastic way to sneak in some protein with the paneer filling variations .
Packed with nutrients, they can make for a comfort food that still feels a bit fancy. not to mention, they’re vegetarian, so they cater to those looking for wholesome, meat-free options.
You could easily serve these buns at gatherings, and trust me, they never last long! plus, you can customize the filling based on what you have or your mood.
Feeling adventurous? toss in some spices or veggies! they’re not just great for appetizers; they can also be the star of your dinner table.
What’s the Catch?
Now, don’t get me wrong—these buns are not without their challenges. the dough-making process is a handful, especially for beginners, but hey, that’s part of the fun! and if you mess up, you’ll probably still end up with something delicious.
The ingredient list is straightforward, and you probably have most of the essentials already lying around your kitchen.
Sure, it requires a bit more effort than pouring cereal into a bowl (yeah, we’ve all been there). but the satisfaction you’ll get from pulling out golden buns from the oven is totally worth it.
You’ve got some serious bragging rights when you can say you made homemade paneer dishes from scratch!
In terms of cost, these buns are wallet-friendly. For about the price of a fancy coffee, you can bake up a whole batch that yields 12 buns . Seriously, it’s a steal!
Perfect for Every Occasion
These buns are like the swiss army knife in your culinary toolbox. they work for casual gatherings, birthday parties, or even as a side dish for a more formal meal.
Each bun filled with spiced paneer filling brings a burst of flavor and warmth—perfect for those chilly evenings or when you want to impress your guests without breaking a sweat.
So, are you ready to roll up your sleeves? get your apron on because we’re about to jump into the world of fluffy delight with cheese oozing out of every bite.
Let’s gather our ingredients and start turning that kitchen into a bakery with the rich aroma of savory bun recipes wafting through!
What You’ll Need
Before you dive in, peek at the ingredient list. It’s pretty simple, and many items are pantry staples. You’ll definitely want to grab some paneer , mozzarella , and a few spices to really amp up that flavor!
Let’s go ahead and gather our goodies to whip up these amazing Bake Paneer Buns with Melty Cheese Delight . Get ready; you're about to create something incredible!
Unlocking the Essentials for Perfectly Baked Paneer Buns
When it comes to baking , having a solid grasp on your ingredients can make all the difference, especially when you're about to bake paneer buns with melty cheese delight .
These golden, soft buns are filled with a delicious spiced paneer and gooey cheese, making them a hit at any gathering.
Let’s dive into your essential ingredients guide so you can master this recipe and elevate your baking game!
Premium Core Components
First up, measuring your ingredients is key. Here’s a quick breakdown:
- For 3 cups of all-purpose flour , you’re looking at about 360 grams . The weight can make a huge difference in texture!
- Use 1 packet (2 ¼ tsp or 7 g) of instant yeast for that perfect rise.
- Don’t skip the 2 tbsp (25 g) of sugar; it feeds the yeast and helps with browning.
Always check the quality indicators when shopping. Fresh yeast should be fragrant and active. Look for flour that’s soft and finely milled.
As for storage , keep your dry goods in a cool, dry place. that flour? it can last about 6-12 months when stored right.
If you’re unsure about freshness, give it a sniff; it should smell clean, not musty!
Signature Seasoning Blend
Moving onto flavor town! what’s a bun without the right spices? you’ll need garam masala and cumin seeds for that authentic flavor hit.
The great thing about indian cooking is the flexibility with spices; feel free to adjust based on your personal taste!
For herbs, fresh cilantro works magic. It pairs perfectly with the spiced paneer filling . Keep some ready to sprinkle on top for garnish—it adds a pop of color and freshness!
Smart Substitutions
Found yourself short on an ingredient? No sweat! Here are some smart substitutions :
- If you’re out of paneer, ricotta can step in. Just drain and squeeze out excess liquid.
- For a dairy-free option , try using vegan cheese and plant-based milk. It’s a hit, especially with your lactose-intolerant pals.
- What about gluten-free? Use a gluten-free flour blend that’s suitable for baking.
These swaps keep your meals inclusive, which is especially great for family-friendly recipes.
Kitchen Equipment Essentials
Okay, let’s chat tools. You don’t need a fancy kitchen to whip up these buns, but having the basics will definitely help:
- A large mixing bowl is a must. Your dough will need room to rise, and trust me, it will rise!
- A rolling pin helps flatten that dough like a pro.
- Don’t forget parchment paper for the baking sheet —it prevents sticking and makes cleanup a breeze.
For the best preparation tips , always have your tools ready before you start. trust me; it saves so much time and fuss in the kitchen.
And as for storage solutions , consider keeping your appliances accessible but organized—no one wants to dig through a mountain of stuff when they need a whisk!
Wrapping It Up
As you gather your ingredients for those delicious baked paneer buns , remember this guide! it’s all about understanding your essentials.
With the right measurements, quality ingredients, flavorful spices, and handy tools, you'll make those cheese stuffed buns the star of your snacks.
Ready to dive into the fun part? in the next section, we'll lay out the step-by-step instructions for baking these delightful buns.
Trust me, once you try them, these comforting, savory indian street food -inspired treats will become a go-to in your home!
Stay tuned for more on how to get that perfect rise and melt-in-your-mouth filling!
Professional Cooking Method for Baking Paneer Buns with Melty Cheese Delight
So, you want to bake paneer buns with melty cheese delight , huh? trust me when i say you’re about to impress your friends and family with these golden, cheesy bites of heaven.
Let’s dive into how to make these yummy treats!
Essential Preparation Steps
First things first: let’s talk about mise en place , which is just a fancy way of saying, “everything in its place.
” gather up all your ingredients— 3 cups of all-purpose flour, a packet of instant yeast, sugar, warm milk , and of course, the star, paneer ! you know, having everything ready cuts down on chaos in the kitchen.
Now, onto time management . set a timer. trust me, it works wonders. each part of this recipe—from making that dough to baking the buns—needs attention.
Here’s the scoop: let the dough rest for an hour after kneading. use that time to whip up the filling!
As for organization strategies , keep your workspace clean. A cluttered kitchen can lead to mishaps. My tip? Clean as you go! It makes the cooking process way less nerve-wracking.
And, of course, let’s not ignore safety considerations . Make sure to use a sharp knife when chopping ingredients and keep your workspace free of spills to avoid slips.
Step-by-Step Process
Ready to dive in? Let’s go!
-
Activate the yeast: in a bowl, mix 1 cup of warm milk , 2 tbsp sugar , and a packet of instant yeast .
Let it sit until foamy—about 5- 10 minutes .
-
Form the dough: combine that milky goodness with 3 cups of flour , 1 tsp of salt , and 3 tbsp of melted butter .
Mix it until it becomes doughy. knead on a floured surface for 8- 10 minutes . this dough needs some love to be smooth.
-
The Big Rise: Place it in a greased bowl, cover it with a towel, and let it rise until it’s doubled, which will take about an hour .
-
Make the filling: sauté 1 onion and 2 cloves of garlic in a bit of oil until they're translucent. toss in crumbled paneer , 1 tsp garam masala , and ½ tsp cumin seeds , then season with salt and pepper.
Cook for 2- 3 minutes , and stir in 1 cup of shredded mozzarella .
-
Assemble those buns: preheat your oven to 375° f ( 190° c) . punch down that risen dough and divide it into 12 portions .
Roll each into a circle, plop in some of that gooey paneer filling, and pinch it shut.
-
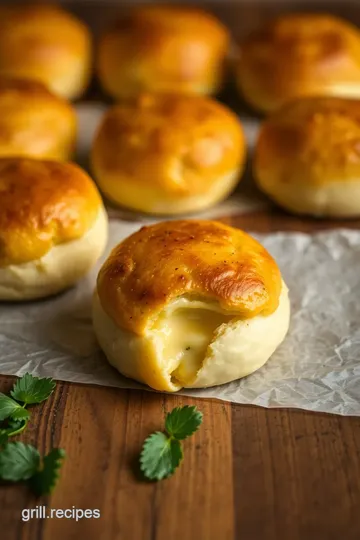
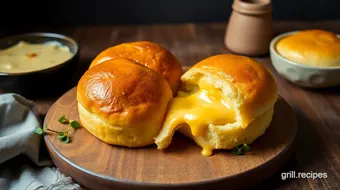
Final Rise: Place the buns on a parchment-lined baking sheet, let them rise for another 20 minutes , then bake for 20- 25 minutes until they’re glorious and golden.
Expert Techniques
When you’re making these baked paneer buns , keep an eye on your temperature and timing . if you bake them too long, you'll have a dense bun instead of that soft, airy perfection.
A light golden-brown color is your visual cue for doneness—nature’s way of saying, “eureka! they’re ready!”
Troubleshooting tip: If your buns don’t rise well, check your yeast! Old yeast can be a real party pooper.
Success Strategies
Okay, let’s chat about the common mistakes people make. overstuffing your buns is a big one. seriously, nobody likes a mess when they bite into what’s supposed to be a heavenly snack.
I learned this the hard way when i had a cheese explosion in the oven—what a nightmare!
Quality assurance tip: Always taste your filling before stuffing. It’s your secret to success!
If you’re thorough in your prep and quick with those assembly skills, you’ll end up with these fantastic cheese-stuffed buns that are just chef’s kiss .
Oh, and don’t forget: these buns can be made ahead of time! you can even freeze them. just bake them, cool completely, freeze on a tray, then pop them into a resealable bag.
When hunger strikes, just thaw and reheat!
Now that you’re armed with all these tips, you’ll be ready to impress everyone with your homemade paneer dishes .
Additional Information
If you want to add even more flavor or try out different paneer filling variations , consider adding in some spices or veggies! what’s your take on adding those spicy cheese buns to your next dinner party? not only will they be a hit, but they also make delicious appetizing finger foods that your guests will rave about.
So grab those baking supplies, channel your inner chef, and enjoy the process! Trust me, the joy of baking these delights will have you coming back for more. Happy baking!

Pro Tips & Secrets for Bake Paneer Buns with Melty Cheese Delight
Oh my gosh, if you’re diving into the world of baked paneer buns , get ready for some serious flavor! Let me spill some of my insider tips.
First off, let’s talk time-saving techniques . make that dough ahead of time! prep it the night before and let it rise in the fridge.
This not only saves you time but also enhances the flavor. you’ll wake up to a gorgeous, yeasty smell—nothing says comfort food like that!
Now for some flavor enhancement tips . when making your paneer filling, don’t skip the garlic and onions. they add depth that makes these cheese stuffed buns irresistible.
Also, sprinkle in a touch of dried herbs or some chili flakes if you like a bit more of a kick .
Trust me, your taste buds will thank you!
And for that presentation advice : don’t just toss those buns on a plate! a sprinkle of fresh cilantro on top can be a game-changer.
It adds color and that visual appeal we all love.
Perfect Presentation: Elevate Your Buns
Plating can seriously make or break your dish. For those amazing savory bun recipes , there are a few tricks to ensure your cheesy snacks shine.
Start with your plate. a simple white dish can make those golden buns stand out! for a fun pop of color, add a side of chutney—maybe a tangy mango chutney or some mint yogurt.
The contrast is eye-catching.
For garnishes, think fresh! chopped herbs like cilantro or scallions sprinkled on top of the warm buns not only look great but also give off an amazing aroma.
A drizzle of olive oil or butter will make them glisten—talk about instagram-worthy !
Storage & Make-Ahead: Keep Those Buns Fresh
Now, let’s chat about storage guidelines . i know the struggle of leftovers. these homemade paneer dishes can easily last a couple of days in the fridge.
Just make sure to wrap them tightly to keep the softness intact.
If you’re planning a meal prep day, these buns can be frozen after baking! just let them cool completely, pop them in a freezer bag, and they’ll be good for up to a month.
When you’re ready to devour them, just reheat in an oven (around 350° f ( 175° c) for about 10 minutes) for that fresh-baked experience.
Creative Variations: Spice It Up
The beauty of cooking is that you can always shake things up! with paneer filling variations , the sky's the limit.
Want a spicy cheese bun ? add some chopped fresh chilies or a spoonful of spicy red chili paste to the filling.
And if you’re feeling adventurous, throw in some seasonal veggies like spinach or roasted bell peppers. You can easily make these buns a reflection of what's available and fresh around you.
For those with dietary modifications in mind, using gluten-free bun alternatives is as easy as swapping out the flour. There are plenty of gluten-free flour blends that do wonders in baking!
Complete Nutrition Guide: Easy on the Eyes
A detailed breakdown of these delicious buns shows they are not only tasty but pretty decent in the nutrition department too! each bun packs a good amount of protein from the paneer, plus healthy fats from the cheese.
If you’re like me and have a love/hate relationship with carbs, portion guidance is key. rather than wolfing down all 12 buns at once (easy to do!), keep it to one or two and serve with a side salad or some appetizing finger foods .
Your New Favorite Dish Awaits!
So there you have it! whether you're whipping these up for a family dinner or serving them as a quick appetizer at your next gathering, bake paneer buns with melty cheese delight is definitely going to be a hit.
With a little practice, you’ll master those soft, pillowy buns in no time.
Don't forget to embrace your creativity in the kitchen! every batch can be a little different. so why not give it a go? you might end up with a new family favorite or a dish that has your friends begging for the recipe.
Happy baking, y'all!
Frequently Asked Questions
What are Bake Paneer Buns with Melty Cheese Delight?
Bake Paneer Buns with Melty Cheese Delight are soft, golden buns filled with a flavorful mix of crumbled paneer and melted cheese, enhanced with aromatic spices. They make for a scrumptious snack or appetizer, offering a delightful blend of Indian flavors baked into a delicious bread.
Can I make Bake Paneer Buns with Melty Cheese Delight ahead of time?
Yes, you can prepare the dough and filling the day before. After assembling the buns, you can cover them and refrigerate overnight. Allow them to come to room temperature and rise for about 20 minutes before baking for the best results.
What are some tips for successful Bake Paneer Buns with Melty Cheese Delight?
To ensure your buns are successful, monitor the yeast activity to ensure it foams properly in warm milk. Be careful not to overfill the buns to prevent them from bursting during baking. Lastly, brushing with melted butter after they come out of the oven adds a delightful flavor and shine!
How should I store leftover Bake Paneer Buns with Melty Cheese Delight?
Store any leftover buns in an airtight container at room temperature for up to 2 days or in the refrigerator for up to a week. To reheat, simply warm them in an oven or microwave until heated through for the best taste.
Can I customize the filling for the Bake Paneer Buns with Melty Cheese Delight?
Absolutely! You can customize the filling by adding vegetables like bell peppers or spinach, or spice it up with green chilies for heat. For a cheesy twist, you can combine different types of cheese or add herbs for extra flavor.
What is the nutritional information for Bake Paneer Buns with Melty Cheese Delight?
Each bun contains approximately 230 calories, with 9 grams of protein and 10 grams of fat. They also include 28 grams of carbohydrates and 1 gram of fiber. Keep in mind that specific nutritional values may vary based on your ingredient choices and portion sizes.
Deliciously Cheesy Bake Paneer Buns Card
⚖️ Ingredients:
- 3 cups (360 g) all-purpose flour
- 1 packet (2 ¼ tsp or 7 g) instant yeast
- 2 tbsp (25 g) sugar
- 1 tsp (5 g) salt
- 1 cup (240 ml) warm milk
- 3 tbsp (45 ml) unsalted butter, melted
- 200 g paneer (crumbled)
- 1 cup (100 g) shredded mozzarella cheese
- 1 small onion, finely chopped
- 2 cloves garlic, minced
- 1 tsp garam masala
- ½ tsp cumin seeds
- Fresh cilantro, chopped (for garnish)
- Salt and pepper to taste
🥄 Instructions:
- Step 1: In a mixing bowl, combine warm milk, sugar, and instant yeast. Let it sit for 5-10 minutes until foamy.
- Step 2: Add flour, salt, and melted butter. Mix until a dough forms.
- Step 3: Knead the dough on a floured surface for 8-10 minutes until smooth.
- Step 4: Place dough in a greased bowl and cover. Let it rise in a warm place until doubled (about 1 hour).
- Step 5: In a skillet, heat a drizzle of oil over medium heat. Sauté chopped onion and garlic until translucent.
- Step 6: Add crumbled paneer, garam masala, and cumin seeds. Season with salt and pepper. Cook for 2-3 minutes. Remove from heat and stir in shredded mozzarella.
- Step 7: Preheat oven to 375°F (190°C).
- Step 8: Punch down the risen dough and divide into 12 equal portions.
- Step 9: Roll each portion into a circle, add filling in the center, and pinch the edges to seal. Shape into a bun.
- Step 10: Place buns on a parchment-lined baking sheet. Let them rise for another 20 minutes.
- Step 11: Bake for 20-25 minutes or until golden brown. Enjoy warm!
Previous Recipe: Easy & Cheesy Garlic-Dill Herb Rolls: The Perfect Comfort Food
Next Recipe: Refreshing Chilled Seafood Salad with Lobster & Avocado: My Favorite Summer Delight